New for MNMLUS theme, unlimited currency checkout options & unlimited shipping/delivery options has been pre-installed [*]. This page is the detail instructions to install MNMLUS template for Blogger.

Below is the full tutorial to install, edit & customize BlogrCart MNMLUS Blogger theme. This step-by-step guide will show the IMPORTANT parts to edit accordingly to Blogger store owners personal preferences.
Use the quick links below to navigate instantly to the required settings. Use the arrow button to guide you back here.
Important Blogger Theme Update - April 14 2016!
To allow the Theme Plug-ins gadget to register itself with your new theme setup, users are required to activate the
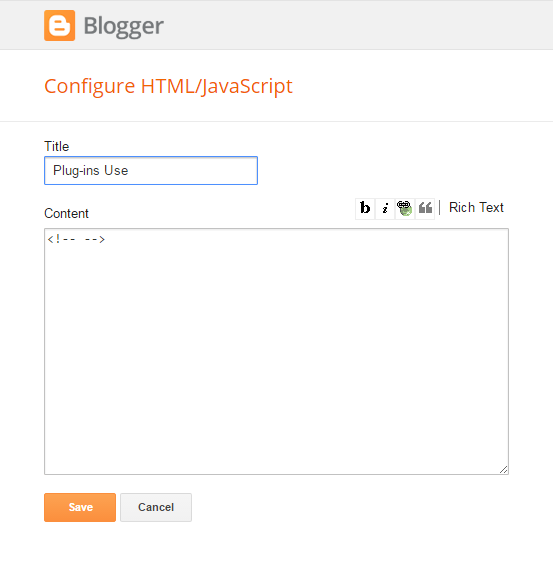
To allow the Theme Plug-ins gadget to register itself with your new theme setup, users are required to activate the
HTML/Javascript gadget with the title Plugin or DoNotRemove Cart Plugins or Plug-ins Cart located at the bottom of theme Layout. Click Edit the said gadget & add some content to save it. View screenshot below for reference.
Quick Links
1.0 Download &Install Template
Download FREE Version here Download FREEMIUM VERSIONIn this download, you will get below files:-
- Full blogger theme/template codes.
- Auto Post Templates codes
- License & general instructions in readme.txt file
- Theme icons.
Download PRO version here Download PRO VERSION [FULL]
In this download, you will get below files:-
- Full blogger theme/template codes.
- Pre-made product posts & handler pages.
- Auto Post Templates codes
- License & general instructions in readme.txt file
- Theme icons.
UNZIP & upload using Blogger dashboard >
Template > Backup/Restore > at Upload a template from a file on your hard drive. > click the Choose File button. Once success, preview your new template.To allow this theme to display correctly in mobile screens, turn off Blogger
default mobile theme by going to Settings, Mobile section, click the Gear button & select No. Show desktop template on mobile devices. , Then click Save.Turn off Blogger image pop over for best performance by going to
Settings > Basic > Turn Off/Don't Show image zoom.General clean-up
Locked widgets/gadgets may occur when installing new Blogger templates. It is best to replace/remove the "locked" widgets for trouble free installations. Known widgets/gadgets are:-- Navbar
- Attribution
To remove a "locked" widget/gadget, before installing any new template/theme, at template/theme codes, find the above widget/gadget by using the
Jump to Widget button.Select the the entire codes that is used for the widgets. An example mark-up codes is as follows:-
<b:widget id='WIDGET_NAME' locked='true' title='WIDGET_TITLE' type='WIDGET_TYPE'>

... Lots of codes ...

</b:widget>
Delete all the codes starting from
<b:widget> and ending with the first trailing occurrence of </b:widget> . Click Save Template once done.2.0 Install Pre-made Pages [PRO Theme]
For BlogrCart MNMLUS PRO users, the template files comes withlicense, template/theme file & theme Pages. PRO users can build quickly sample Product Pages including the Send Order page (if any), Success page & Error handling Pages. In addition this tutorial is also included for references & future usage.Upload the file title
BlogrCart-*-PAGES-MASTER-V-1-0.xml at Settings, Other & Import Blog link, find the file in your computer & upload accordingly making sure the Automatically publish all imported posts and pages is ticked/selected.3.0 Install Pages
3.1 Install Atuo Post Template
[PRO users can skip this section]This page is used to re-direct users once successful sending in their orders via send order e-mail or after successful transactions at Paypal.
Go to
Pages > Add a Page and at the Title field type in Success & click Save.Edit the page body as this page will be the
return page from success orders using the send order form functionality checkout. Click Publish Page & view this page full URL at your browser bar by clicking the View link.An example URL will look like so:-
http://YOUR-BLOG-NAME.blogspot.com/p/success.htmlSave this URL using your favorite text editor in your PC.
3.2 Install Error Page
[PRO users can skip this section]This page is used to re-direct users once successful sending in their orders via send order e-mail or after successful transactions at Paypal.
Go to
Pages > click Add a Page & at the Title field type in Error & click Save. Edit the page body as this page will be the error handling page upon users non delivered orders using the send order form functionality checkout. Click Publish Page & view this page full URL at your browser bar by clicking the View link. An example URL will look like so:-http://YOUR-BLOG-NAME.blogspot.com/p/error.html
Save this URL using your favorite text editor in your PC.
4.0 Install Auto Post Template
[PRO users can skip this section.][Update: FREEMIUM users has been included the codes below at download files.]
Find your Auto Post Template updated codes below in this theme/template download folder with file title
blogrcart-*-auto-post-template.txt. Use & install as instructed below. A fully customized auto post template comes pre-included with BlogrCart templates. Important as most of the shopping cart functionalities & also how the product displays depends on this template.
At
Blogger Dashboard > Settings > Post & Comments > Post Template > click the Add link to insert the codes below:-<table border="1" cellpadding="5" class="product-image" rules="all">
<tbody>
<tr>
<td class="thumb_image">
<div class="separator" style="clear: both; text-align: center;">
<a href="https://blogger.googleusercontent.com/img/b/R29vZ2xl/AVvXsEittFazPhUPutwkHfwVa6Rub1QhBTK3iW2VVhNiI4VeBymZdD535TXxNDAHKeTQH_LstArx9VtD_zSp42tziCbC_s06FMflEpBuWGRYFKbvn23PNKPy2T7UoeLqzpyk5hbvoD9gHbwrw8w/s1600/GrassGreen_W_B.jpg" imageanchor="1" style="margin-left: 1em; margin-right: 1em;"><img border="0" src="https://blogger.googleusercontent.com/img/b/R29vZ2xl/AVvXsEittFazPhUPutwkHfwVa6Rub1QhBTK3iW2VVhNiI4VeBymZdD535TXxNDAHKeTQH_LstArx9VtD_zSp42tziCbC_s06FMflEpBuWGRYFKbvn23PNKPy2T7UoeLqzpyk5hbvoD9gHbwrw8w/s1600/GrassGreen_W_B.jpg" /></a>
</div>
</td>
</tr>
</tbody>
</table>
<table border="1" cellpadding="5" class="product-description" rules="all">
<tbody>
<tr class="label-description">
<td class="item_description">
This is the short description for any product post. Write a short description for the product here in not less than 350 words.
This will create a unique content for your product hence giving the extra boost from search engine results.
Use Blogger "Remove Formatting" functions to remove copied & paste texts alignment, fonts, text colour & text styles.
<br />
<br />
Use table #1 (above) for product Main Image. Insert Image & removing using Blogger editor features.
<br />
Use table #2 (current) for product descriptions & texts.
<br />
Use table #3 (below) to add in supporting images, text etc. Please insure that the thumbnail images is set to small.<br />
Use "Jump Break" AFTER table #2 (current) or BEFORE table #3 to prevent Auto Pagination. By default the "Jump Break has been assigned.<br />
<br />
<b>Edit & remove sample texts if not in use.</b><br />
Option size & colour only available on PRO versions. Get 1 now!
</td>
</tr>
</tbody>
</table>
<table border="1" cellpadding="5" class="product-price" rules="all">
<tbody>
<tr><td class="item_price h4">$ 32.00</td></tr>
<tr class="label-add"><td><label>Qty:</label>
<input class="item_quantity form-control" size="1" type="text" value="1" />
<a class="item_add btn btn-default btn-custom" href="javascript:;">Add to Cart</a>
</td>
</tr>
</tbody>
</table>
<!--more--><br />
<div class="product-detail">
<table border="1" cellpadding="5" class="product-thumbnail" rules="all">
<tbody>
<tr>
<td><div class="separator" style="clear: both; text-align: center;">
<a href="https://blogger.googleusercontent.com/img/b/R29vZ2xl/AVvXsEh94GC1RJhuv1b6k10FrMW0kITuJCoNRgybs_CbdJTNJXAQW_FM62OQOsNndpQ5-7qfRutHhYtDDBr684gf7WeplCXRl6lyJNmVMMF4-mkQeLiZgshTu6KKZdHYkMF0yS3sZHoz1huWL4de/s1600/GrassGreen_M_B.jpg" imageanchor="1" style="margin-left: 1em; margin-right: 1em;"><img border="0" height="200" src="https://blogger.googleusercontent.com/img/b/R29vZ2xl/AVvXsEh94GC1RJhuv1b6k10FrMW0kITuJCoNRgybs_CbdJTNJXAQW_FM62OQOsNndpQ5-7qfRutHhYtDDBr684gf7WeplCXRl6lyJNmVMMF4-mkQeLiZgshTu6KKZdHYkMF0yS3sZHoz1huWL4de/s200/GrassGreen_M_B.jpg" width="128" /></a></div>
<div class="separator" style="clear: both; text-align: center;">
<a href="https://blogger.googleusercontent.com/img/b/R29vZ2xl/AVvXsEhEyIxriKc0hFMmfpRFjXU_Vrgiv2Ee-envyUW-eheO-VbK9tSEhVgjU3tMYqILeIya-bAg0HcqVb2uDO85NRpxC-soAj7Yi3tx7A00PnWlSoDBWAbMUFCjrl_JO6b1OLNyia_oJAi8VLyM/s1600/GrassGreen_M_S.jpg" imageanchor="1" style="margin-left: 1em; margin-right: 1em;"><img border="0" height="200" src="https://blogger.googleusercontent.com/img/b/R29vZ2xl/AVvXsEhEyIxriKc0hFMmfpRFjXU_Vrgiv2Ee-envyUW-eheO-VbK9tSEhVgjU3tMYqILeIya-bAg0HcqVb2uDO85NRpxC-soAj7Yi3tx7A00PnWlSoDBWAbMUFCjrl_JO6b1OLNyia_oJAi8VLyM/s200/GrassGreen_M_S.jpg" width="88" /></a></div>
<div class="separator" style="clear: both; text-align: center;">
<a href="https://blogger.googleusercontent.com/img/b/R29vZ2xl/AVvXsEgVg-KVe1Bkk55jtwjEaIPynZSuQjn2z8fE2eyNLKOSbjtm0addnGSdPkhqJRG7FmGVsRtRGvBF7WNa2BIX1tv0QNcNMYUN3he8oaYGIfHCbSjxBq5jPT9luAdahIKs5Y3bp-QALEDd4hZv/s1600/_DarkChocolate__________________M_F.jpg" imageanchor="1" style="margin-left: 1em; margin-right: 1em;"><img border="0" height="200" src="https://blogger.googleusercontent.com/img/b/R29vZ2xl/AVvXsEgVg-KVe1Bkk55jtwjEaIPynZSuQjn2z8fE2eyNLKOSbjtm0addnGSdPkhqJRG7FmGVsRtRGvBF7WNa2BIX1tv0QNcNMYUN3he8oaYGIfHCbSjxBq5jPT9luAdahIKs5Y3bp-QALEDd4hZv/s200/_DarkChocolate__________________M_F.jpg" width="139" /></a></div>
<div class="separator" style="clear: both; text-align: center;">
<a href="https://blogger.googleusercontent.com/img/b/R29vZ2xl/AVvXsEhf5_vU6NhBgC6PY8oX3bCANR7x8zlc850LyqGX79EFgRBGNwT8EDIJY1kFPiYKtA_BSmPCPyH7097LG1ZsCtjo540JrQ9Il5ZYAfSfgbSCLustWJF92j46xXUSPYoX05Qz1_ycxQW-P2KU/s1600/DarkChocolate_M_B.jpg" imageanchor="1" style="margin-left: 1em; margin-right: 1em;"><img border="0" height="200" src="https://blogger.googleusercontent.com/img/b/R29vZ2xl/AVvXsEhf5_vU6NhBgC6PY8oX3bCANR7x8zlc850LyqGX79EFgRBGNwT8EDIJY1kFPiYKtA_BSmPCPyH7097LG1ZsCtjo540JrQ9Il5ZYAfSfgbSCLustWJF92j46xXUSPYoX05Qz1_ycxQW-P2KU/s200/DarkChocolate_M_B.jpg" width="124" /></a></div>
</td>
</tr>
</tbody>
</table>
</div>
The auto template comes with a
price field, a product thumbnail field, a description section to insert relevant contents for your Product Post. Edit the contents before posting your product. Example product images & thumbnail images are included for reference. Please use as your guide.Note: The select by colour & select by size is included in PRO template file download. PRO users have the full codes with custom functions used with the advance auto post template.Click
Save Settings. Preview the example Auto Post Template by clicking the Pencil icon to start a Post.5.0 Customizing Shopping Cart Functions
Plug-in Location
All shopping cart detail functions & customization is included in template. Each functions is tagged & detailed out with examples for future editing purposes.All add on functions & plug-in libraries is located at
HTML99 widget unless otherwise stated. Pre-compressed for optimization & human readable[*].Below are the general guidelines to customize theme shopping cart. Follow these simple editing steps to get your Blogger store running in minutes!
5.2 #1 Currency Settings
This section is to customize your Blogger store shopping cart currency. More than 30 short codes (or pre-sets) have been introduced to customize based on international currency codes. The currency pre-sets is as follows:-* Available pre-set currencies
* Currencies supported by Paypal
* Ref: https://developer.paypal.com/docs/classic/api/currency_codes/
code: "USD" "US Dollar",
code: "AUD", "Australian Dollar",
code: "BRL", "Brazilian Real",
code: "CAD", "Canadian Dollar",
code: "CZK", "Czech Koruna",
code: "DKK", "Danish Krone",
code: "EUR", "Euro",
code: "HKD", "Hong Kong Dollar",
code: "HUF", "Hungarian Forint",
code: "ILS", "Israeli New Sheqel",
code: "JPY", "Japanese Yen",
code: "MYR", "Ringgit Malaysia",
code: "MXN", "Mexican Peso",
code: "NOK", "Norwegian Krone",
code: "NZD", "New Zealand Dollar",
code: "PHP", "Philipine Peso",
code: "PLN", "Polish Zloty",
code: "GBP", "Pound Sterling",
code: "RUB", "Russian Ruble",
code: "SGD", "Singapore Dollar",
code: "SEK", "Swedish Krona",
code: "CHF", "Swiss Franc",
code: "TWD", "Taiwan New Dolar",
code: "THB", "Thai Baht",
code: "TUR", "Turkish Lira",
*
* Currencies not supported by Paypal but included as pre-sets
*
code: "BTC", "Bitcoin",
code: "INR", "India Rupee",
code: "IDR", "Indonesia Rupiah",
code: "NGN", "Nigeria Naira",
code: "VND", "Vietnam Dong",
code: "PKR", "Pakistan Rupee",
Insert a
value='USD' and at data-code='USD' (example for US Dollar) using the currency pre-sets codes given. Example for a preset currency settings:-<input class='cartCurrency' data-accuracy='' data-after='' data-code='USD' data-decimal='' data-delimiter='' data-name='' data-symbol='' type='hidden' value='USD'/>
Currencies Not Listed?
If however the currency of choice is not listed as pre-sets, or blogger store owners require to activate a custom currency at this section, activate the custom currency by replacingvalue='USD' to value='custom' & edit the related data-* values required. Example for custom currency settings as follows<input class='cartCurrency' data-accuracy='2' data-after='false' data-currencyrates='no' data-code='MYR' data-decimal='.' data-delimiter=',' data-name='Ringgit Malaysia' data-symbol='RM ' type='hidden' value='custom'/>
A
value='custom' is required to activate the custom currency settings. Edit the data-* attributes values (highlighted in cyan) accordingly. The above custom settings is to activate a Ringgit Malaysia currency for this theme.To activate the currency rates set at #10 currencyrates section, change data-currencyrates='no' to data-currencyrates='yes' & automatically the currency options of choice is displayed at checkout section.
All the hard work is already assigned by the shopping cart. Please refer section #10 Currency Settings to include your currency rate of choice.
Important: Section #1, Section #2, Section #3 & Section #10 in template works together. All details & examples has been included.
5.3 #2 Shipping & Tax Rate Settings
This section is used to customize shopping cartshipping/delivery methods/rates & the tax rate to apply. This section also allows store owners to activate a custom shipping/delivery just like the example used at this demo.Shipping can be used in
4 different methods:-shippingFlatRate- A flat rate shipping. When activated used withdata-shippingrateas its values.shippingQuantityRate- A quantity based shipping in percentage. When activated used withdata-shippingrateas its values.shippingTotalRate- A fixed total rate regardless of items in cart. When activated used withdata-shippingrateas its values.shippingCustom- A custom rule based on average weight of items in cart. When activated used withdata-value*extracted from the select options at checkout summary. [PRO]
Read the required settings to customize your
shipping rate & tax rate values inside theme/template codes. Detail explanation for shippingCustom is covered in theme codes & also at this demo site.Example setting up a shipping by
quantity rate settings. Say you require 5% of the total amount in cart to add in as shipping charges. So the value to insert here would be 5/100 = 0.05.<input class='shippingMethod' data-shippingrate='0.05' data-taxrate='0.06' data-taxshipping='no' type='hidden' value='shippingQuantityRate'/>
By keying the
value='shippingQuantityRate' activates this shipping method & uses 0.05 (or 5%) from cart totals as the shipping charge.Same value calculations used for the
tax rate highlighted cyan. 0.06 equals 6% of the totals in cart as the tax charges.5.4 #3 Paypal Settings
This section is used to checkout atPaypal. A registered e-mail address with Paypal is required. Users can also use Paypal sandbox mode to simulate transactions at Paypal. In addition, the return Url's at section 5.5 is used to handle transaction returns from Paypal.<input class='paypalSettings' data-currencyconvert='no' data-currencytoconvert='USD' data-email='your_email@some_mail.com' data-sandbox='false' type='hidden' value='yes'/>
Highlighted yellow is the
email used at Paypal. set the data-sandbox to true if you require to make some tests using Paypal's sandbox feature.For PRO users, checkout to Paypal have options to checkout to available currency of choice supported at Paypal. The shopping cart auto calculates based on your currency exchange rates set at
#10 & sent to Paypal for checkout.To allow auto currency conversions to Paypal checkout, activate this function by setting
data-currencyconvert='yes' & add in a Paypal supported currency by code at data-currencytoconvert='USD'. The currency rate for this conversion is required and MUST be available as an option at #10 currencyrates options.Important: Section #1, Section #2, Section #3 & Section #10 in template works together. All details & examples has been included.
Deactivate Paypal Checkout
Set thevalue='no' to deactivate Paypal checkout/remove the Paypal checkout button at checkout/shopping cart section.Detail currencies supported at Paypal listed in theme codes for your reference. More info at Paypal Developer page with links provided in theme.
5.5 #4 Page Handlers
This section covers the page handlers forsend order email & Paypal. The settings here are self explanatory. URL's from Section 3.1 & 3.2 is required here.An example mark-up code for editing is as follows:-
<input class='returnUrl' data-error='http://blogstore-name.blogspot.com/p/error.html' data-success='http://blogstore-name.blogspot.com/p/success.html' type='hidden' value='true'/>
Insert the URL's from Section 3.1 at highlighted yellow. Insert the URL from Section 3.2 at highlighted cyan.
5.6 #5 Send Order Email Settings
This section covers the send order email settings. The values for editing is self explanatory. Edit to store preferences.An example settings for send order email is as follows:-
  <input class='eStore' data-email='you@yours.com' data-name='MNMLIS Store' type='hidden' value='true'/>

  <input class='eStoreBiz' data-address='123, Some Street, Some Town 123456 Some State, SOME COUNTRY.' data-contact1='0123-12345678' data-contact2='0123-12345678' data-contact3='0123-12345678' data-name='MNMLIS Ltd. (MY)' type='hidden' value='true'/>

  <input class='eStoreNotes' data-note1='Note in Line 1.' data-note2='More notes in Line 2.' data-note3='Some more notes in Line 3.' data-note4='Last line for notes.' data-sendshippingoption='no' type='hidden' value='true'/>

  <input class='eStorePay' data-pay1='Banking Name 1' data-pay1name='Name at Account 1' data-pay1number='1234567890' data-pay2='Banking Name 2' data-pay2name='Name at Account 1' data-pay2number='1234567890' data-pay3='Banking Name 3' data-pay3name='Name at Account 3' data-pay3number='1234567890' type='hidden' value='true'/>
Store name & email to receive the sent orders edit at highlighted yellow.
Edit blogger store preferences at highlighted cyan.
To add in additional notes per line basis at email body, edit the text highlighted green.
To add in banking instructions edit at highlighted orange. Note that
data-pay1='*' data-pay1name='' and data-pay1number='*' acts in a single line when rendered at email body.[NEW for PRO]
Now store owners can send users shipping selected shipping option straight to the email body. Activate by changing
These conditions only applies if
By using
Now store owners can send users shipping selected shipping option straight to the email body. Activate by changing
data-sendshippingoption='no' to data-sendshippingoption='yes'. That's it! These conditions only applies if
shippingCustom is used for your store shipping method.By using
data-sendshippingoption='yes' the text for data-note1='Note in Line 1.' will act as the subject & comes before the fetched user option from checkout. Neat! 5.7 #6 Form Send Order Alert Settings [PRO]
This section covers the texts displayed when handling the send order submission. Edit thedata-* values to store preference.An example where the editable areas is as follows:-
<input class='sendOrderAlertTxt' data-alerttext='Please check your order form. One or more errors occured.' type='hidden' value=''/>Edit the values/texts at highlighted yellow.
5.8 #7 Shopping Cart Alert Settings [PRO]
Alert text displayed to enhance users shopping experience. The values are self explanatory. Edit to store preferences.<input class='cartHelperTxt' data-cartaddedtxt='Success. Your selected product has been added to cart.' data-cartemptytxt='Currently your cart is empty.' data-cartshippinglimittxt='Weight exceeds shipping limit. Please continue sending your orders. We will contact you for alternative shipping assistance.' data-cartshippingtxt='Please choose a shipping destination.' data-cartshippingtxtother='Other shipping destination has been selected. We will contact you & for the delivery rate based on your preferences. Please continue sending your orders.' type='hidden' value='custom'/>
Replace/edit the
data-* values highlighted yellow to your custom settings.5.9 #8 Homepage Image Slider Settings
To include an image for the homepage slider, go toBlogger Layout & find Slider-Section and click Edit at the Image Gadget required for the slider image customization (highlighted in box cyan below). The details editing for an Image Gadget would be as follows:-Title- The text to display as the slider image title.Caption- The text displayed as a Call to Action button for this image slider.Link- the URL to link your Caption (button) at image slider.Image- Upload an image using the functions provided by the image gadget. Leave thecheckboxempty. Best image size1200px X 900pxat4:3 image aspect ratiobelow 150kb in image files size.- If you require to remove an image here, click the
Removelink and upload another image of choice. - Click
Save.

Continue editing the pre-installed
Image Widget/Gadget (3 nos). When done, click Save Arrangements & view your Blogger theme slider section changes.Users could also add in more slider images just by clicking
Add a Gadget link. Then select another Image Gadget & rearrange the images accordingly by drag & drop the Image Gadget within the Slider-Section.More images means more bytes to render your homepage. Customize accordingly.
In addition you can also set the image slider speed and transitions at theme codes as follows:-<input class='imgSlider' data-autoplayspeed='4000' data-cssease='linear' data-speed='400' type='hidden' val=''/>Edit the highlighted areas accordingly with detail instructions & editing included in theme/template codes.
6.0 NEW #8A WishList Settings [PRO]
A wishlist function can be activated or de-activated at a PRO BlogrCart MNMLUS theme/template. Customize text alerts, how product displayed at the custom WishList page is detailed out. Editing features & options to customized is explained separately at the page http://blogrcart-mnmlus.blogspot.com/2015/08/tutorial-activate-wishlist-fo-blogrcart.html
6.1 #9 Shipping Average Weight Settings [PRO]
This section is covered separately. Please browse this demo for details. Details explanation & tutorial to use the custom shipping can be found here http://blogrcart-mnmlus.blogspot.com/2015/08/tutorial-activate-customize-shipping-by.html.
6.2 #10 Currency Rates Settings [PRO]
This section is covered separately. Please browse this demo for details. Details explanation & tutorial to use the custom shipping can be found here http://blogrcart-mnmlus.blogspot.com/2015/08/tutorial-activate-customizing-blogrcart.htmlImportant: Section #1, Section #2, Section #3 & Section #10 in template works together. All details & examples has been included.
6.3 #11 Related Product Post
This section is to customize how the product posts displayed at product pages & blog pages. Below the example settings as default:-
<input data-currency='RM' data-currencyafter='false' data-defaultimage='https://blogger.googleusercontent.com/img/b/R29vZ2xl/AVvXsEjzQSZWaqTrajseERVVNCCQXKxk2DjG__Wmu3yr0B1FOl0ydLVDVmQRbH78iiodF_9s2F5QmhuKGnwQQvV0HhS1xNwfPLt0L-v-RLtSFmW82ocauNBtLvUO7APAoGZW8qC1O-wtyGOpUVSS/s320/10540_blogrcart-mnmlisblog_13_1280_compressed.jpg' data-imagesize='240' data-maxresults='5' data-titlelength='35' id='related-product-settings' type='hidden' value='true'/>
To change the currency displayed at related product posts edit at highlighted yellow
data-currency='RM'If you require your currency symbol to display after the integers change
data-currencyafter='false' to data-currencyafter='true'To include a default image if an image is not found by Blogger feed, insert the url to your uploaded image at
highlighted blue.The default image size can be changed at
data-imagesize='240' whereas the integers are in pixels.If the product post titles is to long edit the amount of chars to display at
data-titlelength='35' .6.4 Instagram Feed Settings
Display your brand Instagram Feed easy by using the pre-installed custom widgets which comes with this theme.At
Blogger Layout, find this widget at About Section with the title Instagram & click Edit to view the widget settings. There are 2 input fields displayed & enter as below:-Title- The title to be displayed at your Instagram Feed section in theme.HTML/Javascript- Enter or type in your Instagram hashtag used with your images for instance if you use#mybloggerthemeas your common hashtag then key in "mybloggertheme" (without quotes) to display your images at Instagram.
6.5 Facebook Fanpage Settings
Display your brand Facebook Fanpage easy by using the pre-installed custom widgets which comes with this theme.At
Blogger Layout, find this widget at About Section with the title Facebook & click Edit to view the widget settings. There are 2 input fields displayed & enter as below:-Title- The title to be displayed at your Facebook fanpage section in theme.HTML/Javascript- Enter or type in your Facebook Fanpage name/username for instance " irsahindesigns " (without quotes)
How to get my Facebook Fanpage name?
Go to your Facebook Fanpage & view the URL at your browser bar. Below is the example:-https://www.facebook.com/irsahindesignsor
https://www.facebook.com/012345678901234567889Key in the
highlighted yellow at your theme Facebook widget as instructed above.Have a question or having some trouble?
Send it to us using this theme support page here. Our team members would gladly assist you.[*] Unless otherwise stated in theme/template listings.
Out Of Topic Show Konversi KodeHide Konversi Kode Show EmoticonHide Emoticon